Building a Ball Balancing AI in Unity, Part 1
Go to Part 2
The last post touched on an example that we will now look at in greater detail. In this example, we will be building an AI that brings a dropped ball to rest at the center of a platform. To accomplish this task, the AI will apply a torque to the platform to navigate the ball towards the center. For those unfamiliar with physics terms, torque simply means a rotational force on the platform.
This is part one of a two part walkthrough. This post will cover the thought process and code behind building the AI and part two will cover training the AI we create.
The source code and Unity project for this example can be found in the SmartEngine Unity Example Projects on GitLab. You'll need the SmartEngine AI Library, which is free for Indie developers. Let's get started!
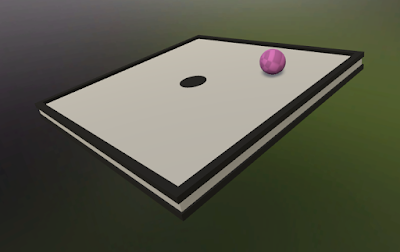
|
| The final, trained AI in action |
Here is how the scene is set up in Unity:

|
| The Unity object hierarchy |
The main objects of interest are the ball, platform, platform motor, and genetic trainer. The ball is nothing complicated - just a sphere with a rigid body and collider. The platform has a script we will look at, a rigid body, and a joint that locks the translation and one rotational axis. The platform motor interfaces with the AI to drive the platform. And the genetic trainer we will use to teach the motor how to drive the platform.
On the platform's script, there is one method of interest - the method to apply a torque to the rigid body.
public void ApplyTorque(Vector3 torque)
{
    _rigidBody.AddTorque(torque, ForceMode.Acceleration);
}
The incoming torque parameter will be supplied by the AI every physics frame. This example uses an applied acceleration. Using velocity should work equally well because the beauty of the AI we are making is that it can find any mapping of game state to torque. Through training, the AI will find the best mapping without direct intervention from us. That said, in practice I've found using velocity produces physics glitches in Unity where the swinging platform will go through the ball. So we'll stick with acceleration. Now let's dive into making the AI.
As outlined in the previous article, we will be using a neural network to drive the torque. The neural network is simply a graph of nodes that we must first model. Modeling the graph means to define the inputs, the outputs, and the internal structure. After we have the model, we need to train the graph to produce desireable output.
Looking at our setup, what inputs do we need? We must think about what information a human would need to control the platform. Foremost, we need the ball's XYZ position in space. It's also useful to see how the ball is moving over time. One way to do that would be to feed just the ball's position into a long-short term memory node (LSTM). The LSTM is a special kind of trainable neuron layer which can be used in place of a linear layer when you want to track input changes every frame. However, I got better results by using a regular linear layer and passing in the ball's current instantaneous velocity. Finally, we need information about the current state of the platform. The current orientation is useful, but how we inject it to the graph is important. One way would be to pass the XYZ euler angles. This isn't the best because they tend to change wildly at the boundary of certain orientations, which can confuse the AI. Another way would be to pass in the orientation as a quaternion. This is better because the values are smoother. However, we can knock the number of inputs further if we pass in the 'up' vector alone. Less inputs means less weights to train, which is great as long as the data is just as 'rich'. Normally, just one vector isn't enough to determine orientation, but here it is because we don't allow the platform to spin around its up axis. One last piece of information. We ultimately care about adjusting the platform's orientation, but we've decided to just control the accleration. Therefore, we can only really impact the platform's angular velocity every frame. So let's pass in the current angular velocity so that the network can make a judgement call on what the acceleration should be. And that's it!
So in all, we have a 3 component ball position, a 3 component ball velocity, a 3 component platform up vector, and a 3 component angular velocity. We'll create an input buffer to store these values and pass them as input into the neural network. Our graph in JSON currently looks like:
{
  "Name": "Platform",

  "Nodes": [
    {
      "Name": "Input",
      "Type": "BufferInput",
      "Parameters": {
        "Dimension": 12
      }
    }
  ]
}
Let's now look at the outputs of the graph. The API to control the platform's acceleration takes in a 3 component vector, but we only need 2 components because we don't allow yaw rotation. With each neuron layer, we get to choose how to modify the output before handing it to either the next layer or the output. This is called an activation function. One solution would be to not apply an activation and just pass through the raw results, but I've found through experimentation that this does not lead to the best results. Instead, we'll be apply a hyperbolic tangent (tanh) function to the last neuron layer. This will bound our output to (-1.0, 1.0). However, that range may not be enough torque to swing the platform fast enough, so we'll scale it before handing it to the rigid body. We can do the multiply directly in the graph, but at the time this example project was written, that was not possible, so we'll just do it in code. We're almost done modeling the graph!

|
| Hyperbolic tangent (tanh) function. The output is bound between -1.0 and 1.0. |
We've defined the inputs and the outputs and now it's time to define the middle "hidden" layers. As mentioned in the last article, I like to start with 3 layers in total, so 2 hidden layers. I also start with a selu activation as a matter of preference. We'll start with 48 neurons, and decrease towards the last output layer. The number is a bit arbitrary, but generally, I start with 32 and work by 16 as needed. The number of neurons can be thought as our capacity to handle different input values and more inputs generally need more neurons. The output layer must have a number of neurons equal to the number of output values we want (2 in this case). So finally, our finished graph in JSON looks as follows:
{
  "Name": "Platform",

  "Nodes": [
    {
      "Name": "Input",
      "Type": "BufferInput",
      "Parameters": {
        "Dimension": 12
      }
    },

    {
      "Name": "LinearLayer1",
      "Type": "NeuronLayer",
      "Parameters": {
        "Input": "Input",
        "Type": "Linear",
        "ActivationType": "Selu",
        "NeuronCount": 48
      }
    },

    {
      "Name": "LinearLayer2",
      "Type": "NeuronLayer",
      "Parameters": {
        "Input": "LinearLayer1",
        "Type": "Linear",
        "ActivationType": "Selu",
        "NeuronCount": 40
      }
    },

    {
      "Name": "Output",
      "Type": "NeuronLayer",
      "Parameters": {
        "Input": "LinearLayer2",
        "Type": "Linear",
        "ActivationType": "Tanh",
        "NeuronCount": 2
      }
    }
  ]
}

|
| Selu function. The output is not bounded, but differs when the input is negative or not. |
We now have enough to start writing code. The SmartEngine API makes it possible to manage graphs directly, but it is easier and better to use the graph model system. The graph model system is comprised of models, model views, controllers, and a single manager. The model is an abstraction around a graph and usually we can just use the standard model, which interfaces with a graph resource or graph instance. Graph controllers are the interface between the game code and the model. They get pinged every update to take the game state and feed it into the model. They are pinged again at the end of the update to take the results and feed them back into the game. The model view is an optional layer that helps convert game data concepts into a raw float matrix and vice versa. They are really useful when embedding graphs within graphs to compartmentalize and keep the code clean. Finally the graph manager glues together models and controllers. Perhaps the best aspect of the system is that the manager will optimize the execution of the model when using multiple controllers. If multiple controllers are mapped to the same model, their data will be aggregated and the model will be executed only once. This is much faster than executing the model with one controller's data N times.
So, to get started, let's create a graph manager:
using SmartEngine.NeuralNetworks;
using UnityEngine;

namespace SmartEngine.Examples.BalanceBall
{
    public class Scene : SingletonBehavior<Scene>
    {
        //...

        private GraphManager _graphManager;

        public GraphManager GraphManager
        {
            get { return _graphManager; }
        }

        protected override void Awake()
        {
            // ...

            {
                GraphManager.CInfo cinfo = new GraphManager.CInfo();
                cinfo.Context = new Context();
                _graphManager = new GraphManager(cinfo);
            }

            // ...
        }
    }
}
Not too much going on in this class. This will be our singleton class to hold global scene state and methods. On awake, we simply instantiate a graph manager using a new context. Most objects in SmartEngine require a context and some components need to belong to the same context to work together. The context also allows you to specify whether we want to execute graphs on the CPU or GPU. Here, we are letting SmartEngine decide the best environment, which defaults to CPU. The context will be used when the graph manager instantiates a graph for a model, but you can pass in graphs created with a different context when registering models.
Next, let's look at the graph model view. This class will take higher level concepts from Unity and convert them into something the model understands.
using SmartEngine.NeuralNetworks;
using UnityEngine;

namespace SmartEngine.Examples.BalanceBall
{
    public struct PlatformGraphInput
    {
        public Vector3 BallPosition;
        public Vector3 BallVelocity;
        public Transform Platform;
        public Vector3 AngularVelocity;
    }

    public struct PlatformGraphOutput
    {
        public Vector3 Torque;
    }

    public struct PlatformGraphModelView
    {
        public const string cDefaultGraphResourceName = "PlatformGraph";
        public const string cDefaultModelName = "Platform";

        private const string cInputName = "Input";
        private const string cOutputName = "Output";

        private const float cTorqueScale = 5.0f;

        private GraphInputOutput _graph;

        public PlatformGraphModelView(GraphInputOutput graph)
        {
            _graph = graph;
        }

        public void SetInput(ref PlatformGraphInput input)
        {
            _graph.RequestOutput(cOutputName);

            //------------------

            Matrix data = _graph.GetInput(cInputName);
            data.Resize(1, 12);

            long col = 0;
            SetInput(data, ref col, input.BallPosition);
            SetInput(data, ref col, input.BallVelocity);

            Matrix4x4 transform = input.Platform.localToWorldMatrix;
            Vector3 up = transform.GetRow(1);
            if (up.y < 0.0f)
            {
                up = -up;
            }
            SetInput(data, ref col, up.normalized);

            SetInput(data, ref col, input.AngularVelocity);
        }

        public void GetOutput(ref PlatformGraphOutput output)
        {
            Matrix data = _graph.GetOutput(cOutputName);

            output.Torque = new Vector3(data.GetValue(0, 0), 0.0f, data.GetValue(0, 1)) * cTorqueScale;
        }

        private void SetInput(Matrix inputData, ref long col, Vector3 value)
        {
            inputData.SetValue(0, col++, value.x);
            inputData.SetValue(0, col++, value.y);
            inputData.SetValue(0, col++, value.z);
        }
    }
}
Okay, a lot going on here. Let's go through it piece by piece.
public struct PlatformGraphInput
{
    public Vector3 BallPosition;
    public Vector3 BallVelocity;
    public Transform Platform;
    public Vector3 AngularVelocity;
}

public struct PlatformGraphOutput
{
    public Vector3 Torque;
}
Here we are defining the high level inputs and outputs of the graph. They should look familiar as we they map to what we defined above. Data in this format makes it easy to interface with Unity and our game. Note that all the objects in this file are structs as they are intended to be light weight. They will be instantiated every frame on the stack inside the controller.
private GraphInputOutput _graph;

public PlatformGraphModelView(GraphInputOutput graph)
{
    _graph = graph;
}
The SmartEngine graph controller class extends from graph input output, so this is just a reference to the controller. It's better to use this base class instead of a controller directly because we can ask for a component object, which returns an instance of a graph input output. By working with the input output object instead of the controller, we can easily reuse and nest model views inside container model views.
public void SetInput(ref PlatformGraphInput input)
{
    _graph.RequestOutput(cOutputName);

    //------------------

    Matrix data = _graph.GetInput(cInputName);
    data.Resize(1, 12);

    long col = 0;
    SetInput(data, ref col, input.BallPosition);
    SetInput(data, ref col, input.BallVelocity);

    Matrix4x4 transform = input.Platform.localToWorldMatrix;
    Vector3 up = transform.GetRow(1);
    if (up.y < 0.0f)
    {
        up = -up;
    }
    SetInput(data, ref col, up.normalized);

    SetInput(data, ref col, input.AngularVelocity);
}
This method is called from the controller before the graph is executed. The first thing we must do is tell the model what outputs we want through the RequestOutput() method. The name passed in is the name of the output node in the graph ("Output").
Next, we get a reference to a matrix that will be used as input data into the graph. The name passed is the name of the buffer input in the graph ("Input"). We must explicitly resize the matrix to our needs. In SmartEngine, data sets are treated as rows and the values of a set are the columns. So for one data set of 4 Vector3, we need 1 row and 4 * 3 = 12 columns. Typically, each controller only deals with one row of data at a time. With one row of input, you should typically expect one row of output later.
The inner SetInput() calls are to a helper method that writes the actual column input values and keeps count of what column we are writing to. It's important to note that the order of the columns does not matter. We can pass the values in any mixed up order, but if we change the order, we must retrain the graph.
private void SetInput(Matrix inputData, ref long col, Vector3 value)
{
    inputData.SetValue(0, col++, value.x);
    inputData.SetValue(0, col++, value.y);
    inputData.SetValue(0, col++, value.z);
}
This is the helper method that writes the column inputs for a single Vector3. 0 is hardcoded as the row index because this controller only deals with one set of data.
public void GetOutput(ref PlatformGraphOutput output)
{
    Matrix data = _graph.GetOutput(cOutputName);

    output.Torque = new Vector3(data.GetValue(0, 0), 0.0f, data.GetValue(0, 1)) * cTorqueScale;
}
Finally, this method is called by our controller after the graph has executed. We get the output matrix for the node that we requested. We expect one row of output with two columns because we specified one row of input and the output node has two neurons. We read the values and stuff them in a Vector3, multiplying by a scalar before handing back to the controller. This in turn will be handed over as is to the platform.
Let's look at our controller, which sits between the graph manager, model view, and platform.
using SmartEngine.NeuralNetworks;
using UnityEngine;

#pragma warning disable 0649

namespace SmartEngine.Examples.BalanceBall
{
    /// <summary>
    /// Drives platform movement based on the output of the neural network
    /// </summary>
    public class PlatformMotor : MonoBehaviour
    {
        [SerializeField] private Platform _platform;
        [SerializeField] private Ball _ball;

        private GraphController _controller;

        private void Start()
        {
            _controller = new GraphController(new GraphController.CInfo());

            _controller.PreExecute += OnPreExecute;
            _controller.PostExecute += OnPostExecute;

            Scene.Instance.GraphManager.RegisterController(_controller, PlatformGraphModelView.cDefaultModelName);
        }

        private void OnDestroy()
        {
            _controller.PreExecute -= OnPreExecute;
            _controller.PostExecute -= OnPostExecute;

            if (Scene.Instance)
            {
                Scene.Instance.GraphManager.UnregisterController(_controller);
            }
        }

        private void OnPreExecute()
        {
            PlatformGraphInput input = new PlatformGraphInput();

            input.BallPosition = _ball.transform.position;
            input.BallVelocity = _ball.Velocity;
            input.Platform = _platform.transform;
            input.AngularVelocity = _platform.AngularVelocity;

            PlatformGraphModelView view = new PlatformGraphModelView(_controller);
            view.SetInput(ref input);
        }

        private void OnPostExecute()
        {
            if (_controller.HaveNewOutputData())
            {
                PlatformGraphOutput output = new PlatformGraphOutput();

                PlatformGraphModelView view = new PlatformGraphModelView(_controller);
                view.GetOutput(ref output);

                _platform.ApplyTorque(_output.Torque);

                // To help with consistency in training, ensure the platform is
                // always in the exact spot
                _platform.ResetPosition();
            }
        }
    }
}
The PlatformMotor object shown in the Unity hiearchy contains an instance of this script.
[SerializeField] private Platform _platform;
[SerializeField] private Ball _ball;
Here are our references to the ball and platform, which we need to fill the model view's input struct before graph execution. After graph execution, we will use the output to set the torque on the platform object.
private void Start()
{
    _controller = new GraphController(new GraphController.CInfo());

    _controller.PreExecute += OnPreExecute;
    _controller.PostExecute += OnPostExecute;

    Scene.Instance.GraphManager.RegisterController(_controller, PlatformGraphModelView.cDefaultModelName);
}
When this script is created, we create a new SmartEngine graph controller and hook into the pre and post graph execution callbacks. We then register this controller with the graph manager. We pass in the name of the model we want to associate with and optionally pass in an override for how frequently we want the controller to update. Here, we leave the update rate set to the model's default. Note that we can register the controller with the model without actually having the model registered. When the model is registered, we'll be automatically hooked up.
private void OnDestroy()
{
    _controller.PreExecute -= OnPreExecute;
    _controller.PostExecute -= OnPostExecute;

    if (Scene.Instance)
    {
        Scene.Instance.GraphManager.UnregisterController(_controller);
    }
}
Similarly, on destroy, we tear down the controller.
private void OnPreExecute()
{
    PlatformGraphInput input = new PlatformGraphInput();

    input.BallPosition = _ball.transform.position;
    input.BallVelocity = _ball.Velocity;
    input.Platform = _platform.transform;
    input.AngularVelocity = _platform.AngularVelocity;

    PlatformGraphModelView view = new PlatformGraphModelView(_controller);
    view.SetInput(ref input);
}
This is our pre graph execution callback. We create our model view and input structs, fill the input with game state, and call into the model view to set the data on our controller.
private void OnPostExecute()
{
    if (_controller.HaveNewOutputData())
    {
        PlatformGraphOutput output = new PlatformGraphOutput();

        PlatformGraphModelView view = new PlatformGraphModelView(_controller);
        view.GetOutput(ref output);

        _platform.ApplyTorque(output.Torque);

        // To help with consistency in training, ensure the platform is
        // always in the exact spot
        _platform.ResetPosition();
    }
}
This is our post graph execution callback. We first need to check if we have new data because this callback is invoked regardless if we've set data or not. It can be the case that you don't set data during pre execute (for example when your character is dead). In that case, this check will return false. Next, we create another view model and retrieve the graph output. (Note that the model view and output objects are structs, so this doesn't allocate managed memory). The output is directly fed into the platform's torque. Finally, we reset the position of the platform to be exactly zero. This is necessary to have deterministic trials when we implement the trainer. I'll talk more about that later. That wraps up our platform motor controller.
Last steps before we can see our work in action. We must register the model with the graph manager and call Update() on the graph manager every frame.
public class Scene : SingletonBehavior<Scene>
{
    public bool TrainingInProgress { get; set; }

    // ...

    protected override void Awake()
    {
        // ... Create the graph manager ...

        Time.fixedDeltaTime = 1.0f / 30.0f;

        // Register the default graph model
        _graphManager.RegisterModelFromGraphResource(PlatformGraphModelView.cDefaultGraphResourceName,
            PlatformGraphModelView.cDefaultModelName);
    }

    // ...

    private void FixedUpdate()
    {
        // If we are training, we will update the network manually in the trainer
        if (!TrainingInProgress)
        {
            UpdateNetworks(Time.fixedDeltaTime);
        }
    }

    public void UpdateNetworks(float dt)
    {
        _graphManager.Update(dt);
    }

    // ...
}
We pass a model name and graph resource name to RegisterModelFromGraphResource() to register the model with the controllers. SmartEngine will automatically load the graph and set the weights if the weights have been saved. When calling RegisterModelFromGraphResource(), we have the option of specifying the default update rate of the model. Not specifying a value causes the model to execute with each call to the manager's Update() function.
We also step the graph every physics frame if not training. We'll look at training in the next post, where we will see that we don't want to be tied to Unity's update methods in order to achieve super-realtime training.
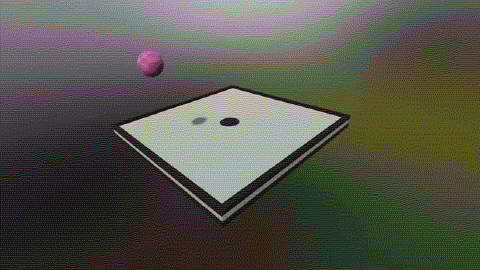
And with that, we're done! Easy peasy. Here's how our platform behaves when we have not trained the graph:

|
| Untrained AI behavior |
Not the best performance we've seen. That's to be expected since without training, the graph is initialized with random weights, so we get random output. In the next article, we'll take a look at how to train this graph so that it produces results we want. Until then, take care!
Go to Part 2

Comments
Post a Comment